I’ll show you how to apply for the SBI. Simply click credit card because it’s super easy to get approved. You don’t need to provide any income proof or do any video KYC. SBI Simply Click Credit Card Apply
Scroll Down To See Website Link
Table of Contents
SBI Simply Click Credit Card
You just fill in your details, and if your credit score is good, they’ll give you the card. Based on your credit score, they’ll also set your credit limit, which you can see right there. So, now let’s see how to apply for it.
I’ll show you. Before that, talking about the charges here, there are annual charges of ₹500 plus GST and renewal charges of ₹500 plus GST.
Right now, anyone who has account credits will also get an Amazon gift voucher worth ₹500. So basically, the joining fee is covered. Now, about the renewal of ₹500 plus GST, just use this card. Anyone who uses this card within one year and spends ₹1,00,000 within that year…
Card Apply in Telugu
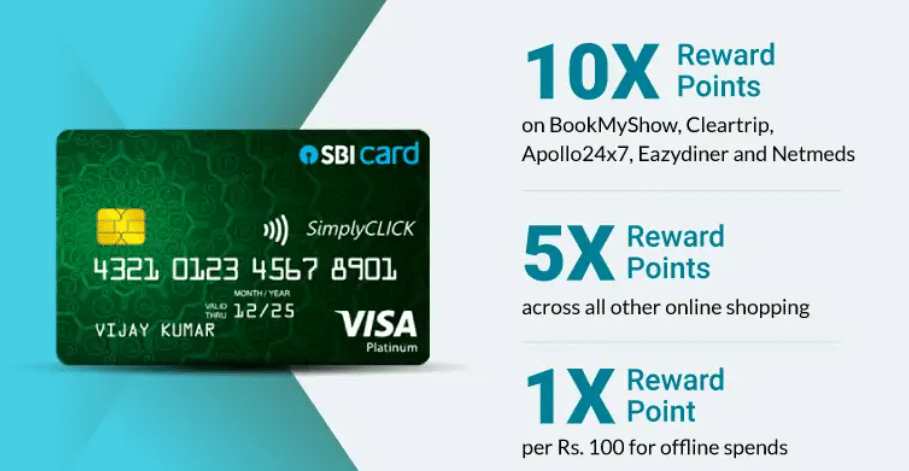
Let’s say they made a purchase and got a ₹2000 voucher, alright? I’ll show you that here too. After that, if you use this card to make payments on these platforms you see here, you’ll earn 10 times the silver points.
You can use these points to convert them into cash for many people or convert them into gift vouchers. If you have any doubts about how and in how many ways you can convert the points earned on your credit card, let me know.
If you’re interested, comment below and I’ll make the next video. Now, I’ll show you how to apply for this ESBI Simply Click credit card. You just need to provide your details here.
Assuming you have a good credit score, they’ll approve your card. Once you have the card, you can use it to shop on Amazon or Flipkart and get extra discounts. I’ll show you how to apply now. The official website link is in the description below.
Apply Process Explain
I’ve given the link; just click on it. When you click, it will open like this. What you need to do is, if you’re applying for the first time, click on “Start Apply Journey.” Now, say you started the process but backed out halfway, or something happened and you left it incomplete.
You don’t need to start all over again. There’s an option called “Retrieve Application” below—click on that, and it will let you continue from where you left off. Got it? So, what you need to do is…
If you want to proceed, first click on the “Apply Journey” button. After clicking, you’ll see three options: Personal Details, Professional Details, and KYC Details (Video KYC or Regular KYC).
Once you fill these out, your card will be issued. Let me show you—first, click on Personal Details. After clicking, enter your name here, including your middle name and last name, and then your mobile number.
Tick the checkbox below and hit the Continue button.
Click on it. After that, you’ll get an OTP—enter the OTP. Then, it will ask for your city name. If you have a nearby city, enter that. After entering it, click on proceed. Then, it will ask for your PAN details. Enter your PAN number and date of birth. Click on confirm.
After clicking, it will ask for your mother’s name, email ID, and referral code—these are optional, so you don’t have to fill them in. Just tick the box and click on the continue button.
After clicking, it will ask if you’re a salaried person, self-employed, or retired.
It asks you to choose. If you click on retired person, you won’t get approval for a maximum credit card. If you’re employed and getting a salary, then click on salary person. After that, if you do any home-based work, click on self-employed person. I’m clicking on self-employed here.
RRB Recruitment Notification Vacancy
Enter your company name, whatever it is. After that, select your designation from the search options available. Then click the continue button. After clicking, it will ask for your address.
You have to provide it. Even if your Aadhaar has an address, it’s okay; just give the address that’s on your Aadhaar. Click on the continue button. After clicking, it will ask you to continue with DigiLocker. Click on that. Once clicked, it will ask you to enter your Aadhaar number.
You’ll get an OTP for this. Below that, enter the captcha shown, then click on the continue button. After this, if you have a DigiLocker account, it will ask you for a PIN. Let’s assume you already have a PIN, so enter your DigiLocker PIN.
Sure. If you don’t want to, just click on ‘Forget’ and create a new one. After that, it will ask for your address. That means the card will be sent to the address you provide here. You can check here that your card will be delivered to the selected address once the postal approval is done.
After postal approval, your card will be sent to this address. If the address is correct, keep it as is. But if you’re staying at a different place, like a rented house or another location, then update it accordingly.
Imagine you need to get this card delivered to you. Since my address has changed, you can click on it and update your address. The card will be sent to whichever address you provide.
Got it? Now, if you scroll up a bit, you’ll see a ‘Confirm’ button—just click that. Once you click, it’ll show whether you’re eligible for this card or not. If you’re eligible, it’ll say so. If not, it’ll let you know that you’re not eligible for the card. Then you can go back.
You might not get the card right away. Let’s say it shows you’re eligible for the card, which means you will get it. Okay, once you’re eligible, what you need to do is click on the continue button.
Here, you have to complete the KYC. KYC isn’t a big deal—after clicking, you’ll need to take a selfie. Just click on ‘Now’ and take your selfie. After that, what they’ll do is link your bank account to this credit card for verification. So, if they…
The amount they send will go into the account we specify. If they need to deduct any amount, it will be deducted from that same account. Here’s what we do: we give them our bank details, and they transfer ₹1 to us. That ₹1 goes into our account.
Then, from whichever bank the ₹1 came from, they send ₹1 back to them. By sending that ₹1 back, they verify the account. Just click on the confirm button. It will ask for the bank name. Okay, so it asks for my bank name, account number, re-entered account number, and the IFSC code.
Imagine you clicked the confirm button after entering the details. ₹1 will be paid from that account. Remember, whichever account the ₹1 comes from, you should be able to pay ₹1 again from the same account. So, if your phone has a minimum balance, that’s the best.
Got it? Since ₹1 was paid, that means the payment is credited. After it’s credited, suppose you click the continue button. Then it will ask for net banking or UPI. I’m choosing UPI. I clicked on UPI. When you click, it will ask you to enter your UPI ID. If you have PhonePe…
Let’s say they gave you a number, meaning the account has that PhonePe number linked to it. What you do is open PhonePe, click on your profile at the top, and there you’ll see all the accounts linked to your PhonePe.
For the account that got credited ₹1, you’ll see a QR code for that account, right? Below it, you’ll see something called UPI. Click on that, and it will copy the UPI ID.
Now, just paste that and make the payment. Once the payment is done, it’ll show as payment successful, meaning it’s done and received on their end too.
Our account gets verified. Now, your card will show up with your name on it, okay? Here, what you do is—I’ve blurred it out in the screenshot—but it also shows your eligibility amount, meaning it tells you what your card limit is.
You can check that, alright? After that, you scroll down a bit and click the confirm button. Then, it gives you two options: Domestic Online Transaction or Domestic Mobile Top-up. Just pick the one you prefer.
CARD DISPATCHING
Go ahead. It doesn’t matter which one you pick, okay? Here, it’ll show you the card—that means the card is displayed. This is your virtual card, and you’ll get the physical card delivered to your home within 5 to 7 days.
If you want, take a screenshot. To see the CVV number on the back, just click on “Click here for CVV.” Once you click that, the CVV on the back of the card will show up. You can use this virtual card right away, and within 5 to 7 days, you can use the physical card too. Got it?
If it says it will take 5 to 7 working days to arrive at your home, just wait until then. Meanwhile, download the SBI app related to the card you see here from the Play Store. Open the app, log in with the mobile number you used, enter that number, and after providing your details, the app will open.
Then, you’ll be able to see your card limit, transactions, statements—everything—right in the app. You can manage everything from there. Okay? It’s that simple and approved.
Sure. Many people try it out because using this card, a lot of folks get great discounts on online purchases. I hope you liked the video.
If you do try it, please make sure to like and share it with your friends. If you have any other doubts, just drop a comment and we’ll clear them up in the next video.
Application Link Here
Please wait 10 seconds…
📥 Apply NowAlso, remember, I only share government-related notifications, not private ones. Okay? If you’re interested, go ahead and subscribe and follow. Cool?
Is the SBI Simply Click credit card a good choice?
Yes, this is the best suitable credit card for everyone
What are the fees of the SBI Simply Click credit card?
499 rupees for annual
Leave a Comment